18 Sep
Heating | Smart Thermostats
Newbury - RG14
Enquiry from: Raj K
Start Date: Immediate
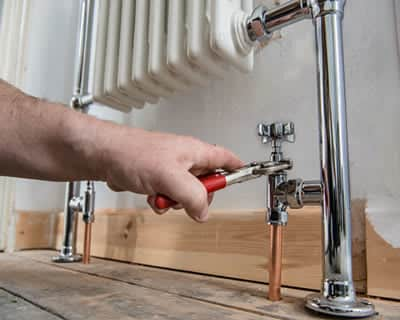
Hive Installation (hub-less)
Managing the way your home is heated is among the better ways to lessen high-priced energy bills and leave you with more disposable earnings at the end of each month. After all, 60% of your energy bill is from heating the home, so it's undoubtedly a great place to begin.
With the right controls you'll be able to keep your house at a comfortable temperature, while at the same time not squandering further money on fuel. You'll likewise be able to keep your home co2 emissions down as well.
Fortunately, heating control systems may be used with just about any boiler, no matter what design or age. This signifies there's a saving to make if you go out there and get it.
By installing a heating control system it will save you in between £70 and £150 each year. Moreover there are a lot of CO2 emissions to be lowered too and you can cut between 310kg and 630kg each year.
Also take into account the temperature you have your thermostat set on. By only switching it down one degree, you can save about £75 annually and won't feel a difference in temperature either.
The typical cost of Heating control system is £300. Costs differ based upon the materials and the tradesman selected. The upper price range can be as high as £345. The material costs are normally about £75
| Avg. price low | Avg. price low |
|---|---|
| Avg. price | Avg. price |
| Avg. price high | Avg. price high |
£1100
£825
£550
£275
£0
| Labour cost | £210 | |
| Material cost | £75 | |
| Waste removal | £15 |
Requests for quotations in Newbury in June 2026
Requests for Heating control system quotations in Newbury in June 2026. 0% change from May 2026.
Requests for Heating control system quotations in Berkshire in June 2026. 0% change from May 2026.
We recorded 1,432 requests for household improvement quotes in Newbury. Of such quotation requests the amount of heating control systems was 2. Quotatis were able to match these customers with up to four ideal experts that were readily available for work in Newbury during those times.
Source: Numbers calculated based on the search volumes in major search enginesRequests for quotations in Bracknell in June 2026
Requests for quotations in Reading in June 2026
Requests for quotations in Newbury in June 2026
Requests for quotations in Wokingham in June 2026
Requests for quotations in Whitchurch in June 2026
Newbury is a civil parish plus the principal town in the west of the county of Berkshire in England. It is found on the River Kennet and the Kennet and Avon Canal, and has a town heart including a lot of 17th century structures. Newbury is best known for its racecourse. The adjoining countryside is significant for agriculture, racehorse training, Highclere Castle, ruined Donnington Castle and features the former USAF airbase at Greenham Common.
Newbury - RG14
Enquiry from: Raj K
Start Date: Immediate
Hive Installation (hub-less)
Newbury - RG14
Enquiry from: Phillip G
Start Date: 3+ months
Are you the property owner: Owner of the property New Boiler Type: Gas Age of boiler: 0-5 years Interested in Heating Control System: Yes How old is your property: 0-25 years
Newbury - RG20
Enquiry from: Kate S
Start Date: Immediate
Are you the property owner: Relative of Owner New Boiler Type: Oil Age of boiler: 10 years + Interested in Heating Control System: Yes How old is your property: 25-50 years Other Forms: None
Newbury - RG14
Enquiry from: Allison G
Start Date: Immediate
Are you the property owner: Owner of the property New Boiler Type: Gas Age of boiler: 10 years + Interested in Heating Control System: Yes How old is your property: 25-50 years Other Forms: Non...
Newbury - RG20
Enquiry from: G R
Start Date: Immediate
Are you the property owner: Owner of the property New Boiler Type: Gas Age of boiler: 10 years + Interested in Heating Control System: Yes How old is your property: 25-50 years Other Forms: None
Newbury - RG14
Enquiry from: Stuart H
Start Date: Immediate
Are you the property owner: Owner of the property New Boiler Type: Gas Age of boiler: 10 years + Interested in Heating Control System: Yes How old is your property: 50 years + Other Forms: None
Newbury - RG14
Enquiry from: Diana A
Start Date: Immediate
Are you the property owner: Owner of the property New Boiler Type: Gas Age of boiler: 10 years + Interested in Heating Control System: Yes How old is your property: 0-25 years Call to appoint
Newbury - RG14
Enquiry from: D S
Start Date: Immediate
Are you the property owner: Owner of the property New Boiler Type: Gas Age of boiler: 10 years + Interested in Heating Control System: Yes How old is your property: 50 years + Other Forms: None
Newbury - RG14
Enquiry from: Ernesto E
Start Date: Immediate
Are you the property owner: Owner of the property New Boiler Type: Gas Age of boiler: 10 years + Interested in Heating Control System: Yes How old is your property: 50 years + Other Forms: None
Newbury - RG14
Enquiry from: Andrew M
Start Date: Immediate
Are you the property owner: Owner of the property New Boiler Type: Gas Age of boiler: 10 years + Interested in Heating Control System: Yes How old is your property: 50 years + Call To Appoint
Newbury - RG14
Enquiry from: Christine W
Start Date: Immediate
Home owner Current boiler 5 years Gas Heating control system required Supplied and Fitted Detached 3 Bedrooms Time scale immediate Contact to Appoint *
Answer a few quick questions, so we can match you with local heating engineers who can help.
Get free, no-obligation local heating control system quotes from 4 verified heating engineers working in Newbury.
Compare customer reviews, services and prices, and choose the right tradesperson for you.
Would highly recommend, they found me a firm which I was happy with a quote they give me and went ahead and had my job done within 2 days of enquiring.
Good easy way to find a selection of trades you need all in one place.
Love Local Quotes it's a big part of my Business I would recommend to anyone
In recent times, home and property owners are constantly looking for ways in which to enhance both energy efficiency and sustainability especially as the world draws closer and closer to energy-efficient technology. The Nest thermostat is a great example of this fact as its designed in such a way to save energy while also cutting heating and cooling costs. And an interesting fact is, you’re not limited to using just a single Nest thermostat in your home as multiple of the device can successfully run together to maintain a consistent level of temperature monitoring as well as energy efficiency. What’s more? You can add up to 20 Nest thermostat and 18 temperature sensors in a home.
It’s very unlikely that you’re going to need this many thermostats in your home, but if you’d like to add a second the process is quite straightforward. However, we’d recommend you employ the services of a seasoned professional especially if you lack the required training or experience to pull this off to save yourself some time and money.
To get started, simply download the associated Nest app to add Nest devices. Now let’s have a look at the processes involved in adding a second Nest thermostat to your home.
• Open the app.
• Go to the top left corner of the main screen and click on the menu button.
• Pick the location or home you’re adding the device to.
• Go to the top right corner and select the “settings.
• Once done, then click on the Add Product “Plus button.
Upon a successful addition of the second thermostat, the app will guide you through the initial set up steps. Google also offers a very helpful guide if you’re unfamiliar with the initial configuration.
Installing your Nest thermostat may not be as easy as screwing a light bulb, but we can also assure you that it isn’t very difficult either. However, if you lack the needed training or experience to pull it off, we’d recommend you hire the services of a professional in order to save yourself some time and money. This guide will give you some quick and easy steps to follow and ensure you make no errors during the installation process.
Once installed removing the Nest Thermostat can be done. To get started, you’ll need just a Philips head screwdriver which Nest has thoughtfully provided with the device.
• Turn off the Nest Thermostat by switching the circuit breaker to the off position.
• Label or mark your old thermostat’s wires. However, if you notice your thermostat is tagged 120v or 240v, or possesses thick wires, do not connect the wires to the Nest as you have a high voltage system.
• Uninstall the old thermostat by locating detaching the wires coming out from the wall into the thermostat. Once done, simply unscrew the device from the wall
• Mark the spot of your thermostat. Do this by threading wires through the Nest base plate’s centre incorporate the tiny bubble level. Once done, you can then use a pencil to mark te two screw holes.
• Attach the trim plate. If you wish to cover the screw holes, simply install the trim plate in the Nest box’s bottom to the base plate.
• Using the screws and screwdriver, attach the Nest base to the wall.
• Connect the wires to the Nest by putting the labelled wires in the Nest’s corresponding ports.
• Put the Nest display by lining up the connector on the display’s back.
• Turn on the power by switching the circuit breaker to the on position
• Connect your Nest thermostat to the WiFi network.
• Follow the on-screen guide and set the temperature.
• Use your smartphone or tablet to download the Nest thermostat’s mobile app to monitor and control your device remotely.
If you’re looking to acquire smart thermostats in your home, but wondering about its money saving qualities, then this is for you! Not only do smart thermostats add new impressive features to your home, but it can also save you both energy and money. According to many reports using a programmable thermostat can save you between the range of £130 to £150 on an annual basis. Now think about using a smart thermostat that makes it a lot more easier for you.
Wondering how smart thermostat save money? Simply set your smart thermostat one or two degrees lower or higher than the usual number. Once done, you’re likely to notice 1% to 3% reduction in your energy bills. And if you want even more, you simply increase the percentage to about 10 degrees to 15 degrees to cover the period you spend at work and watch as you save up to 10 percent of your energy bills.
Generally, a smart thermostats will save you money in two major ways. These includes:
• They Do All The Thinking For You
The smart thermostat watches your behaviour and study the time you’re at home and when you’re not as well as your preferred temperature at particular times in a day, and that’s why they are termed as “smart. they’ll automatically adjust the settings to ensure you get home to a perfect temperature.
• They Keep Tabs On Your Usage
You can always count on a two way communicating smart thermostat to watch your usage while also collecting the data and sharing it with you. It informs you of your energy usage rate as well as the estimated amount. Once you’ve been notified, you can manual adjustment or leave it to the thermostat to help manage your energy.
The short answer to this is no! Smart thermostats can still be used without WiFi, however, they’ll be deprived of some certain capabilities and innovative features that comes mainly due to their ability to connect to the internet. As a result, the smart thermostat will only be functional for basic task such as heating and cooling control. In other words, making use of a WiFi connection will be in your best bet to enjoy the multiple juicy benefits that comes with a smart thermostats such as remote monitoring, ability to connect to other devices and display local weather conditions and much more. And what’s the use of purchasing a smart thermostat if you’d not be able to enjoy these remarkable features?
However, even when you have a WiFi, it’s expected for the connection to fail at times. When this happens, what will be the impact on your smart thermostat? Let’s have a closer look!
• As you would have expected, when your smart thermostat is disconnected from WiFi, features that are controlled with the mobile app would all be impacted. And this might be a big headache when you wish to access these features and control remotely when far away from home.
• When your smart thermostat connection to WiFi fails, all live updates and alerts would be affected. This implies that you’d stop seeing updates, reports and notifications on your mobile device. As a result, you’ll not be notified in case of an emergency like electricity cut-outs, water leaks, humidity and temperatures exceeding the set levels as well as thermostat’s low battery.
• The lack of a WiFi connection might have taken away all the juicy advantages of having a smart thermostat, but one function that remains unaffected is the basic one - the control of your home’s heating and cooling system. In other words, if your smart thermostat is offline, your home will still be heated and cooled to the thermostat’s set temperature.
We can help you get more heating control system work with our qualified job leads and boost your business.
Join today