18 Oct
Heating | Smart Thermostats
Stranraer - DG9
Enquiry from: John S
Start Date: Immediate
price for a new timer controller
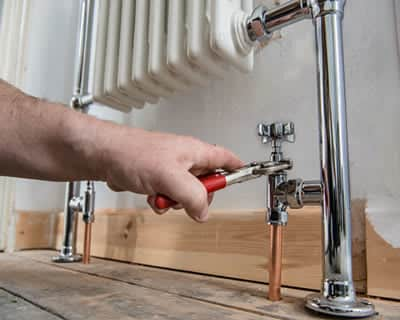
Controlling the way your house is heated is one of the better ways to cut back costly energy bills and leave you with more disposable income at the end of each month. All things considered, 60% of your power bill is from heating the home, so it's certainly a good place to begin.
With the right controls you'll have the ability to keep your property at a comfortable temperature, whilst all at once not losing more money on fuel. You'll likewise be able to keep your household carbon dioxide emissions down too.
Fortunately, home heating control systems may be used with any boiler, regardless of the model or even age. This signifies there's a saving to be made if you go out there and get it.
By putting in a heating control system it can save you between £70 and £150 annually. In addition there are plenty of CO2 emissions to be reduced as well and you'll slash between 310kg and 630kg each year.
Also think about the temperature you have your thermostat fixed on. By just turning it down a single degree, you can save about £75 a year and won't feel a difference in temperature either.
The typical cost of Heating control system is £300. Costs differ based upon the materials and the tradesman selected. The upper price range can be as high as £345. The material costs are normally about £75
| Avg. price low | Avg. price low |
|---|---|
| Avg. price | Avg. price |
| Avg. price high | Avg. price high |
£500
£375
£250
£125
£0
| Labour cost | £210 | |
| Material cost | £75 | |
| Waste removal | £15 |
Requests for quotations in Wigtownshire in June 2026
Requests for Heating control system quotations in Wigtownshire in June 2026. 0% change from May 2026.
Requests for Heating control system quotations in Western Midlands in June 2026. 90% change from May 2026.
We recorded 421 requests for house improvement prices in Wigtownshire. Of such quotation requests the amount of heating control systems was 1. Quotatis were able to match these consumers with up to four suitable specialists who had been readily available for work within Wigtownshire during that time.
Source: Numbers calculated based on the search volumes in major search enginesStranraer - DG9
Enquiry from: John S
Start Date: Immediate
price for a new timer controller
Stranraer - DG9
Enquiry from: Julia T
Start Date: Immediate
Homeowner Heating control system Are you the property owner: Owner of the property New Boiler Type: LPG Age of boiler: 10 years + Interested in Heating Control System: Yes How old is your prop...
Stranraer - DG9
Enquiry from: David G
Start Date: Immediate
Are you the property owner: Relative of Owner New Boiler Type: Gas Age of boiler: 10 years + Interested in Heating Control System: Yes How old is your property: 25-50 years Call To Appoint
Stranraer - DG9
Enquiry from: Mark H
Start Date: Immediate
Are you the property owner: Owner of the property Current Boiler: Oil Age of boiler: 10 years + Interested in Heating Control System: Yes Would you consider an easy payment plan: No Time scale: 1-3 m...
Newton Stewart - DG8
Enquiry from: Rodger F
Start Date: Immediate
Are you the property owner: Owner of the property Current Boiler Type: Gas Age of boiler: 10 years + Interested in Heating Control System: Yes How old is your property: 50 years + Call To Appoint
Answer a few quick questions, so we can match you with local heating engineers who can help.
Get free, no-obligation local heating control system quotes from 4 verified heating engineers working in Wigtownshire.
Compare customer reviews, services and prices, and choose the right tradesperson for you.
Would highly recommend, they found me a firm which I was happy with a quote they give me and went ahead and had my job done within 2 days of enquiring.
Good easy way to find a selection of trades you need all in one place.
Love Local Quotes it's a big part of my Business I would recommend to anyone
If you’re interested in deriving maximum benefits from your central heating system while also being a tech-enthusiast, a smart thermostat is just the perfect option as it allows you to control both your boiler and heating system via your mobile device. It also offers a plethora of features which enables you to heat your home more efficiently while also cutting your energy bills. Here, we’ll be taking a deeper look at the Tado smart thermostat (a user friendly smart thermostat with multiple impressive features such as a great design, self learning and LED interface).
A Tado smart thermostat is a relatively small piece of kit which is perfect for tech-lovers looking to get a first experience of the smart thermostats’ world. Although the appliance might feature just a basic design with a bit less advanced features in comparison with other thermostats like Hive, Nest and more, it however, still comes with some fantastic features which you can’t afford to miss out on. These includes geofencing, Smartphone or tablet control as well as heat scheduling. As you would have expected with any good smart thermostat, the ability to remotely control your heating is a top priority for several smart thermostats’ owners and Tado offers you this and more. Therefore, no more worries during the Winter months and wishing your home should be warm and perfect for your return. Aside this, a Tado smart thermostat also goes a long way to ensure efficient energy use and as a result, reducing the money paid on energy bills.
Overall, Tado is a nicely designed smart thermostat which is relatively easy to use and a perfect option for homeowners interested in having a taste of the world of smart thermostats or looking to replace their existing device.
Installing your Nest thermostat may not be as easy as screwing a light bulb, but we can also assure you that it isn’t very difficult either. However, if you lack the needed training or experience to pull it off, we’d recommend you hire the services of a professional in order to save yourself some time and money. This guide will give you some quick and easy steps to follow and ensure you make no errors during the installation process.
Once installed removing the Nest Thermostat can be done. To get started, you’ll need just a Philips head screwdriver which Nest has thoughtfully provided with the device.
• Turn off the Nest Thermostat by switching the circuit breaker to the off position.
• Label or mark your old thermostat’s wires. However, if you notice your thermostat is tagged 120v or 240v, or possesses thick wires, do not connect the wires to the Nest as you have a high voltage system.
• Uninstall the old thermostat by locating detaching the wires coming out from the wall into the thermostat. Once done, simply unscrew the device from the wall
• Mark the spot of your thermostat. Do this by threading wires through the Nest base plate’s centre incorporate the tiny bubble level. Once done, you can then use a pencil to mark te two screw holes.
• Attach the trim plate. If you wish to cover the screw holes, simply install the trim plate in the Nest box’s bottom to the base plate.
• Using the screws and screwdriver, attach the Nest base to the wall.
• Connect the wires to the Nest by putting the labelled wires in the Nest’s corresponding ports.
• Put the Nest display by lining up the connector on the display’s back.
• Turn on the power by switching the circuit breaker to the on position
• Connect your Nest thermostat to the WiFi network.
• Follow the on-screen guide and set the temperature.
• Use your smartphone or tablet to download the Nest thermostat’s mobile app to monitor and control your device remotely.
Smart controls such as Hive are the next generation technology with more and more people now converting their houses into smart homes to control multiple devices in the homes remotely. Smart technology can be incorporated with several household devices such as security, lighting, entertainment and more. But what if there’s an oil boiler installed in your home, can you still connect your Hive with the your heating? Well, simply read on to find out.
The answer to this question is yes, most oil boilers are compatible with Hive and can substitute for either an existing conventional programmer or thermostat. The smart technology works to help derive more benefits from your heating system and they usually come with apps which can be used to control your home’s heating from anywhere with just your mobile device. Hive, however, cannot work to replace the functions of smart oil boiler heating controls to modulate your heating as they only work on an on or off basis. To make use of the modulating technology in an oil boiler, the cost of manufacture would be considerably higher while offering little advantage in efficiency for the home or property owner. Ultimately, this implies that you can’t incorporate smart technology to control the output in a similar way as a gas boiler, but there are still some ways to utilize smart technology with your oil boiler in such a way to boost your efficiency and lessen the energy bills.
Do you want to use your Hive with your home’s oil boiler? We’d advise you get in touch with an OFTEC qualified engineer if you wish to install Hive Active Heating on your oil boiler, as British Gas engineer do not offer this service.
If you’re looking to acquire smart thermostats in your home, but wondering about its money saving qualities, then this is for you! Not only do smart thermostats add new impressive features to your home, but it can also save you both energy and money. According to many reports using a programmable thermostat can save you between the range of £130 to £150 on an annual basis. Now think about using a smart thermostat that makes it a lot more easier for you.
Wondering how smart thermostat save money? Simply set your smart thermostat one or two degrees lower or higher than the usual number. Once done, you’re likely to notice 1% to 3% reduction in your energy bills. And if you want even more, you simply increase the percentage to about 10 degrees to 15 degrees to cover the period you spend at work and watch as you save up to 10 percent of your energy bills.
Generally, a smart thermostats will save you money in two major ways. These includes:
• They Do All The Thinking For You
The smart thermostat watches your behaviour and study the time you’re at home and when you’re not as well as your preferred temperature at particular times in a day, and that’s why they are termed as “smart. they’ll automatically adjust the settings to ensure you get home to a perfect temperature.
• They Keep Tabs On Your Usage
You can always count on a two way communicating smart thermostat to watch your usage while also collecting the data and sharing it with you. It informs you of your energy usage rate as well as the estimated amount. Once you’ve been notified, you can manual adjustment or leave it to the thermostat to help manage your energy.
We can help you get more heating control system work with our qualified job leads and boost your business.
Join today