

14 Aug
Asphalt or Tarmac Driveway
Morecambe - LA4
Enquiry from: Lynne L
Start Date: Immediate
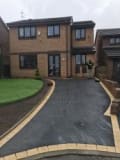
New driveway done in tarmac or asphalt


Over 109 reviews & an average rating of 4.4/5 stars, you'll find the right pro
Use the shortlist button to select up to 4 tradespeople, enter your project details and press send
Get up to 4 quotes from local Driveway Installers near you




Morecambe - LA4
Enquiry from: Lynne L
Start Date: Immediate
New driveway done in tarmac or asphalt
Morecambe - LA3
Enquiry from: Colin E
Start Date: Immediate
Relay crazy paving to rear of the garden
Fleetwood - FY7
Enquiry from: Cheryl I
Start Date: Immediate
Submit your free quote for rated tradespeople
Poulton-le-Fylde - FY6
Enquiry from: Yvonne S
Start Date: Immediate
Patio area needs replacing
Preston - PR3
Enquiry from: Janet H
Start Date: Immediate
An area that is currently lawned…flat…to be paved with Indian stone slabs…approximately 25 square metres
Preston - PR3
Enquiry from: Paul L
Start Date: Immediate
Large Driveway jet washing
Lancaster - LA2
Enquiry from: Chris H
Start Date: Less than one month
Require quote for a resin patio 21-40m sq
Fleetwood - FY7
Enquiry from: Alan B
Start Date: Immediate
26. 2x2 slabs to relay IN BACK GARDEN
Are you planning to install a driveway on your home or property? If yes, then you’ll most likely be interested to know exactly how much it’s going to cost. Well, to get started you’ll have to decide whether you’ll be doing this yourself or perhaps you’d be hiring a specialist. The project could be much more effective if you decide to tackle it on your own as you’re only going to be worried about the paying for the materials without any labour costs. However, installing a driveway is not the simplest of tasks even for the competent and more experienced DIYers. Therefore, if you choose to carry out the project on your own, you should also get ready for a longer completion time than it would have been if you hired a professional which is usually around 48 hours. If you have all the tools and materials in place before commencement, then it’s possible to complete the project over the weekend. However, there are many risks involved such as the possibility of misjudging the proper quantity of concrete mixture (for a concrete driveway) and more. So, how much does driveway installer charge?
Well, just like other home improvement projects, the amount charged by driveway installers depend on a number of factors like the type of driveway (concrete, asphalt, tarmac etc), size of the area, the experience of the professional, the property’s location and lots more. However, in general, the average cost of a driveway ranges between £35 to £85 per square metre. For labour costs, you can expect to pay between £200 to £450 per day based on the work’s complexity.
The table shows the sorts of task that Driveway Installers typically do as well as the regular cost series of these projects. Some jobs take longer to finish than others so costs do be very different by project.
View our Driveway Installer cost guide View our Driveway Installer advice| Driveway Installer job | Driveway Installer cost in 2026 |
|---|---|
| Tarmac paving and driveways in Lancaster | £1,125-£1,725 |
| Block paving in Lancaster | £3,000-£4,600 |
| Slab Paving and Driveway in Lancaster | £1,875-£2,875 |
| Driveway cleaning in Lancaster | £225-£345 |
| Gravel paving and driveways in Lancaster | £3,000-£4,600 |
| Pattern imprinted driveways in Lancaster | £3,750-£5,750 |
| Resin bound driveway in Lancaster | £2,625-£4,025 |
| Driveway repair in Lancaster | £1,520-£2,280 |
| Indian Stone Paving in Lancaster | £2,000-£3,800 |
| Pave Driveway in Lancaster | £1,800-£3,100 |
Patios use durable and hard wearing materials which will be able to withstand extreme weather. It’s important to consider the drainage of your patio, as heavy rain will need to drain away to an area that can absorb the water. A professional will be able to design and lay a patio to do this.
Generally, a paved driveway is always subjected to regular usage and yours isn’t likely to be an exception, otherwise you won’t be here. Regular usage automatically necessitates regular maintenance of the driveway in order to extend its lifespan, make your property safer and add more value to it. This maintenance will involve a frequent inspection of the paved driveway so as to identify and repair divots, cracks as well as rutting. Paved driveways usually have a lifespan ranging between 15 to 20 years, but this can only be guaranteed when backed by regular maintenance activities. Failure to provide your paved driveway with a regular maintenance will lead to a rapid deterioration within just a couple of years after installation.
The issues commonly faced by paved driveways is usually different based on several factors such as the weather, your location, your property’s sub base as well as some other elements. The ability to identify the problems and solve or repair them on time is key to success while it’s also save you some time and money. In this article we’re going to look at how to go about do-it-yourself tasks that involves minor cracks. More intense damages are advised to be handled only by professionals.
✓ Prepare the area. Clear the debris, weed the plants or vegetation (if any).
✓ Use a strong spray from a garden hose to wash clean the cracks
✓ In the event whereby the crack is deep, simply fill it until it reach about a quarter inch of the surface with sand.
✓ Tamp down the sand to make it more compact.
✓ Apply a patching compound to the surface of the cracked paved driveway.
✓ Leave it for some time to cure.
✓ Once cured, you can then apply your sealant.
Resin bound driveways are known to last a long time without the need for repairs, but sometimes accidents happen. You also need to make sure you regularly maintain your driveway by sweeping and power washing it to prevent damage. But if it does get damaged, how do you repair your resin bound driveway?
If you notice a crack in your resin bound driveway, it’s important to repair it as soon as possible. If you leave it to erode, you could end up with a difficult repair that will cost much more money.
To repair a crack, you’ll need to carefully chisel it open slightly so you can apply a primer then fill in the crack with a matching-coloured resin and aggregate mix. While there are variations in colour and size with all stone mixes, usually it’s easy to find a batch that matches almost perfectly. And once the crack has been repaired for a while, it will blend in seamlessly with the rest of your driveway.
To prevent cracking in your resin bound driveway, it’s best to tackle the issue at initial installation. Speak to your installer about whether it’s possible to add fibreglass mesh to the base. You should also ask your installer to add expansion trims as these will significantly reduce the risks of cracks.
So the best way to repair resin bound driveways is to prise open the crack and fill it in. It might seem simple, but getting the right colour match is something that should be left to the professionals, so get a few quotes to ensure you get the best finish.
Driveway surfacing materials like concrete, asphalt and clay brick usually crack because they’ve been exposed to extreme temperatures or put under high pressure. It’s important to repair driveway cracks before they get worse and cause damage to vehicles and perhaps others to trip on raised cracks.
Is Block Paving Permeable?
Back in 2008, there was a regulation introduced which comes with a requirement guiding the pavement of front gardens. It requires homeowners to incorporate the conventional impermeable driveways which makes for an uncontrolled run off of rainwater into sewers, roadways, local watercourses etc. However since then, new systems have been established which complies with the legislation and permit driveway laying of block paving without requiring planning permission while still providing the same visually appealing features as the conventional systems. Therefore, a short and simple answer to whether block paving is permeable is yes.
A permeable paving driveway (unlike the conventional ones which quickly diverts rainwater towards the edges to local drains) purposefully diverts rainwater into the built paving structure which oversees a controlled release of the rainwater into the environment. Permeable block paving comes with a wide range of benefits which includes the following:
• No Planning Permission Required
Unlike the traditional system, permeable block paving requires no planning permission as it oversees the driveway draining by ensuring that the surface water passes directly through the joints which makes sure the drains are not over worked and minimizing the risk of flood.
• Puddles Reduction By Natural Drainage
A permeable block paving minimizes puddles as well as standing water which helps to boost natural drainage. This is due to the laying process which features little voids that permits the passage of water.
• Natural Filtration
A natural filtration occurs when water is allowed to return to the ground by permeable block paving which helps assists in getting rid of any pollutants from the rain water.
• Flood Prevention
Permeable paving can help to prevent flooding as it absorbs water rather than directing it to the local drains or leaving it to build up on the surface’s top.
• Natural & Sustainable Materials
Natural and recyclable materials can be incorporated in producing permeable paving which is an excellent choice especially if you’re seeking a more sustainable driveway.
Have you decided to install block paving and wondering what the best sand to be applied to the joints is in order to achieve a perfect job? Well, you’re at the right place! This is one of the most frequently asked questions when it comes to block paving and we seek to give you a reliable solution once and for all.
The best sand for block paving is a kiln-dried sand. It’s an extremely fine sand which has been dried in a kiln to get rid of all the water before it’s incorporated to achieve the best results. Therefore, the sand contains no moisture and is commonly used to fill the joints of block paving to keep the paving’s structure rigid and strong. It also goes a long way to prevent the ingress of water while stopping the paving from moving and becoming loose. The major reason why the paving sand must be dried is to allow it flow easily into the joints as well as the block paving’s gaps. As result of this smooth flowing to the bottom of the joints, there will be no sand sticking to the sides of the pavers.
Another major reason why kiln-dried sand is commonly applied to the block paving’s joints is to prevent water from penetrating the paved area. It also tightens the individual pavers together to prevent from moving and becoming loose. In the event whereby you happen to leave the joints of your block paving without kiln dried sand, it’s highly likely that they’ll sink as a result of water penetration and the blocks will become very loose. After washing block paving, it’s very important to also replace any sand washed off in the process once the paving is dried to prevent water ingress into the joints.
Moss growth on tarmac and asphalt is pretty common. This can make your driveway or outside area slippy and untidy, so it’s a good idea to get rid of it.
Start by using a stiff brush to dislodge as much moss as possible and clear it off your driveway. Then use a moss killer to kill any remaining moss. Make sure you follow the product instructions – some moss killers are best used on tarmac or asphalt that’s clean and damp, whilst others are better for dry surfaces.
To prevent further moss growth, it’s a good idea to reduce the amount of shade on your tarmac or asphalt as much as possible. This will help you keep it as warm and dry as possible, and reduce moss growth.
If you’re considering laying gravel on your driveway, then you’d probably want to know the amount of gravel you’ll need to complete the project. When you are calculating the amount of gravel you’ll require to cover your driveway, there’s an important factor you’ll need to consider and that is the type of gravel you opt for such as a crushed or pea gravel. There are varying grades which are found in particles from fine to course, with a size ranging from 2mm to 64mm. Therefore, there’s a need to estimate the volume of the gravel while also having the rock’s size in mind. Also, there’s a need to select your most preferred gravel which you’ll like to use before proceeding to dig the depth of your driveway and subsequently determine the amount of gravel that’ll be needed using these excellent tips.
✓ Determine the size and coverage. As you would have expected, the smaller the gravel is, the bigger the coverage will be, and gravels should be at least 4 inches deep. However, if the rocks happen to be a bit large then you can allow for an extra 1/2 inch.
✓ Measure the driveway. Multiply the width by the length and depth to get the size of the driveway in cubic feet. Meanwhile for cubic yards, you can divide the total cubic feet by 27. This is due to the fact that one cubic feet is same as 1.13 tons.
✓ Working with gravel. Here, you’ll have to calculate an underlay measurements differently. You can use 2 inches of road base that’ll be overlaid with 2 inches of gravel.
Answer a few quick questions to help us match you with the right Driveway Installer
Receive no-obligation quotes from 4 Driveway Installers working in Lancaster.
Compare prices, customer reviews and services, and hire the right Driveway Installer.
View our open Driveway Installer jobs near you
Join today

