Cape Decorators
Based: in Glasgow, G71 8NULatest review
Elizabeth S., PA1
Painter | Interior in Paisley
Work starts on the 13th Feb 2018, However with the speed of contact and personal visit, I feel very confident I have cho...
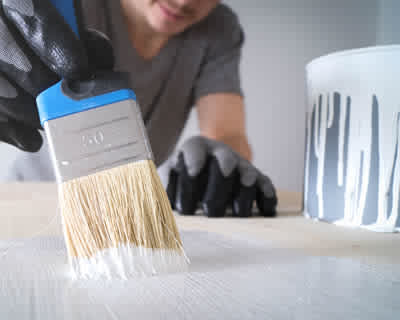
Interior painting can be a very affordable way to brighten up the inside of your house. Painting is often done as a DIY project, but professional painters and decorators can make sure of an immaculate appearance and guarantee that your redecorating will last as long as possible.
You may invest more time getting ready to paint than actually painting. It's advisable to wash and prepare all walls and ceilings before painting, along with to mask off any areas which shouldn't be painted over such as skirting, architrave, electrical sockets and light switches. Wrap furnishings as well as any carpets or flooring in the room with dust sheets to protect against any spills. When painting internally, make use of a primer coat as a base layer then several coats of paint, leaving each layer time to dry in between.
Interior painters and decorators can present you with plenty of advice about paint and help you select the perfect colour palette for your interior spaces.
The average cost of a Painting and decorating is £800. Costs vary based upon the materials and the contractor chosen. The upper price range can be as high as £920. The material costs are mainly around £200
| Avg. price low | Avg. price low |
|---|---|
| Avg. price | Avg. price |
| Avg. price high | Avg. price high |
£1100
£825
£550
£275
£0
| Labour cost | £560 | |
| Material cost | £200 | |
| Waste removal | £40 |
Requests for quotations in Isle Of Mull in June 2026
Requests for Painting and decorating quotations in Isle Of Mull in June 2026. -91% change from May 2026.
Requests for Painting and decorating quotations in Inner Hebrides in June 2026. -100% change from May 2026.
We noted 727 requests for home quotations in Isle Of Mull. Of these quote requests the amount of painting and decorating quotations in Isle Of Mull was 1. Quotatis would have been able to match these consumers with as many as 4 suitable installers who were available for work within Isle Of Mull at that time. Request a free house survey from reliable companies within Isle Of Mull.
Source: Numbers calculated based on the search volumes in major search enginesRequests for quotations in Greenock in June 2026
Requests for quotations in Paisley in June 2026
Requests for quotations in Gourock in June 2026
Requests for quotations in Port Glasgow in June 2026
Requests for quotations in Erskine in June 2026
The Isle of Mull or just Mull is the second-largest island of the Inner Hebrides (after Skye) and lies off the west shore of Scotland in the council location of Argyll and also Bute. With an area of 875.35 square kilometres (337.97 sq mi), Mull is the fourth-largest Scottish island as well as the fourth-largest island surrounding Great Britain (omitting Ireland). In the 2011 census the typical resident population of Mull was 2,800, which was a small boost on the 2001 figure of 2,667. In the summer season the population is supplemented by numerous vacationers. Much of the populace resides in Tobermory, the only burgh on the island up until 1973 and its capital. Tobermory is likewise home to Mull's just single malt Scotch whisky distillery, Tobermory distillery (formerly Ledaig).
Work starts on the 13th Feb 2018, However with the speed of contact and personal visit, I feel very confident I have cho...
Isle of Mull - PA65
Enquiry from: Kyle L
Start Date: Immediate
Inside 3 bedroom house painted and wallpaper Are you the property owner: Tenant (with permission) Property Type: Other How many rooms are you looking to have decorated: 5+ rooms Are you looking to rem...
Oban - PA34
Enquiry from: Jane T
Start Date: Immediate
painting to commercial premises in 24-25 argyll square oban (nancy black) are you the property owner: relative of owner property type: commercial how many rooms are you looking to have decorated: 1-2...
Oban - PA34
Enquiry from: James M
Start Date: Less than one month
Kitchen to strip paper from walls and ceiling back to plasterboard and painted might need skimmed also. Are you the property owner: Owner of the property Property Type: Detached How many rooms are you...
Oban - PA34
Enquiry from: Sandra M
Start Date: Immediate
Wallpaper and paining in all rooms including sanding faders and skirtings Please contact to appoint
Answer a few quick questions, so we can match you with local decorators who can help.
Get free, no-obligation local painting and decorating quotes from 4 verified decorators working in Isle Of Mull.
Compare customer reviews, services and prices, and choose the right tradesperson for you.
Would highly recommend, they found me a firm which I was happy with a quote they give me and went ahead and had my job done within 2 days of enquiring.
Good easy way to find a selection of trades you need all in one place.
Love Local Quotes it's a big part of my Business I would recommend to anyone
Your painter and decorator will carry out most of the preparation work for your project. You can help them by ensuring that the area is clean and tidy. Also, remove as many personal items and pieces of furniture from the area as possible and make sure all your internal doors are firmly closed just in case of dust from rubbing down.
How To Paint A Ceiling
If you’re a bit hesitant to take on the seemingly awkward task of painting your ceiling, you’re definitely not alone. However, there are ways in which you can make ceiling painting tasks one of the less strenuous tasks you’ll find around the house as they’ll help you get rid of most drips and also assist you to easily determine whether or not you’re covering the whole ceiling. In several cases, painting a ceiling simply means painting it white again and most same colour painting jobs are way easier than painting with a new colour entirely. When you have the right size of nap controller as well as the appropriate length of an extension pole, painting over your head will be a lot easier. Here’s how to paint a ceiling.
✓ Prepare the room. This include removing as many furniture and objects from the room as possible while also laying down plastic sheets on the remaining ones. And also cover the floor with paper or canvas drop cloths.
✓ Remove obstructions. Detach or remove everything that can make your work harder like light fixtures or smoke detectors.
✓ Protect surfaces. This includes protecting vertical surfaces like the windows and doors from ceiling paint.
✓ Prepare the ceiling. This involves vacuuming the ceiling to get rid of any dust or dirt, sanding any rough spots on the ceiling with a sandpaper and filling any small holes or cracks in the ceiling (optional).
✓ Prime the ceiling. Use an angled brush or paint edging tool or primer to cut in edges of the ceiling.
✓ Paint the edges of the ceiling. When the primer has dried, simply paint the edges of the ceiling to create a frame in which you can easily work in.
✓ Paint the ceiling in grids.
How To Paint A Room
Painting is a joyful task and it’s quite obvious why it’s one of the most popular DIY projects. Whether you’re painting as an experienced DIYer or as a newbie, this step by step guide will put you in the right direction. However, if you lack the confidence to carry out this task, then we’d recommend you get in touch with a seasoned professional who can guarantee the best results for help. This way, you get to save some time and additional money that would have resulted from possible costly errors.
So just before you head right into the task, there’s the need to determine the type of pain finish you would love to use which is to choose a colour. Now let’s get started!
• Prepare the room
✓ Remove all objects as much as you can from the room and cover the remaining furniture or objects with a sheet.
✓ Fill all holes on the surface to make for an even finish.
✓ Wash the wall with the help of a damp sponge. A sugar soap or diluted washing up liquid will work just fine.
✓ Tape the edges of objects you do not wish to paint like light switches, plug sockets and the likes.
• This step can be skipped if painting on an existing paint, but it’ll advisable to dilute small quantity of your selected paint to patch prime the holes that you’ve filled. If you have a large number of holes that was filled, then priming them would be smart.
• Mix or stir the paint thoroughly in a paint kettle to ensure an even and perfect mix.
• Now you’re ready to start painting! Start from the edges to form like a frame to work within with your roller. Once done, leave for about 4 to 6 hours to dry.
• For the second coat, simply repeat the above step to complete your painting project.
How To Prep Walls For Painting
This is exactly the part of a wall painting job that can make or mar the whole project. To ensure that your paint project doesn’t end up being disastrous, the most important place to start is from room preparation which includes cleaning, sanding as well as priming the walls before painting. Not every wall will require to go through all the preparation steps as all walls are unique and some are in better conditions than others. However, it’s advisable to thoroughly inspect the surfaces before you proceed to painting and take the necessary actions where required.
This is a very simple DIY job that should be completed in little time, however it’s also perhaps the most important step of the entire painting project. Hence, if you lack the confidence to pull this off, then we’d recommend employing a painting expert who can guarantee the best results for help. In this guide, we’ll should you how you can prepare your wall for painting.
✓ Cleaning. There is no single best way to properly clean a wall, but most walls will be just fine with a sponge and warm water. For walls that have been stained with oil or grime such as kitchen walls, you can apply grease cutting detergent and water mixture to wash and follow up with warm water to clean the residues and a damp cloth wiping to finish it off. Then leave to dry off properly.
✓ Remove mildrew. Wipe out mildrew using a sponge and solution that’s three to four parts water to one part bleach. Apply this solution and scrub the affected surface with a soft brush.
✓ Sanding. This step is only meant for walls with rough spots on its surface. Dull the uneven spots with a sandpaper, wipe away the dust and leave to dry. Use a fine grit sandpaper to sand the surfaces and let it dry properly.
✓ Priming. Prime the wall to get the most out of your paint. They work to disguise imperfections and create a smooth surface on which you can work on.
We can help you get more painting and decorating work with our qualified job leads and boost your business.
Join today