15 Aug
Flat Roof Repair
Northwich - CW9
Enquiry from: David K
Start Date: Less than one month
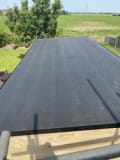
Our garage roof dips down and collects water. Worried this will collapse at some point. Contents also get damp, so it is likely related


Over 364 reviews & an average rating of 4.5/5 stars, you'll find the right pro
Use the shortlist button to select up to 4 tradespeople, enter your project details and press send
Get up to 4 quotes from local Roofers near you








Northwich - CW9
Enquiry from: David K
Start Date: Less than one month
Our garage roof dips down and collects water. Worried this will collapse at some point. Contents also get damp, so it is likely related
Northwich - CW8
Enquiry from: James B
Start Date: Immediate
Submit your free quote for rated tradespeople
Northwich - CW9
Enquiry from: David C
Start Date: Immediate
Gutters need winter leaves cleaning out and down. Spouts unblocking
Northwich - CW9
Enquiry from: Jeff B
Start Date: Immediate
Tiles replaced Rosemary tiles to be replaced
Northwich - CW9
Enquiry from: Jeff B
Start Date: Immediate
Repair roof and general maintenance
Northwich - CW9
Enquiry from: Jeff B
Start Date: Immediate
Roof tile replaced. One Rosemary to be replaced under ridge tile
Northwich - CW8
Enquiry from: Robin P
Start Date: Less than one month
Chimney stack flashing to be replaced. scaffolding is currently up due to solar installation
Northwich - CW8
Enquiry from: Jacob H
Start Date: Immediate
We need our front and rear gutters cleaned and cleared of debris
Northwich - CW8
Enquiry from: Peter Y
Start Date: Immediate
Corrugated roof for garage size 6.6m width 6m deep
How much do Roofers cost? Costs for Roofers in 2026 can be very different depending on the kind of work that you want to have actually performed in your residence. It's the question we get asked a great deal "how much do Roofers charge?". It's often very good to have an idea of how much a Roofer are going to likely charge for their assistance. Prices will most likely fluctuate based on the materials and also the tradesman picked. The table shows the kinds of task that Roofers generally do as well as the standard cost series of these tasks. Some projects take longer to complete than others so costs do fluctuate by task.
View our Roofer cost guide View our Roofer advice| Roofer job | Roofer cost in 2026 |
|---|---|
| Velux windows in Northwich | £409-£718 |
| Tile or slate roofing in Northwich | £3,355-£11,889 |
| Flat roof in Northwich | £1,554-£7,747 |
| Commercial roofing in Northwich | £1,800-£3,088 |
| Flat roof repair in Northwich | £648-£2,267 |
| Gutter cleaning in Northwich | £59-£105 |
| Tile roof repairs in Northwich | £605-£4,903 |
| Chimney sweeping in Northwich | £75-£115 |
| Roof cleaning in Northwich | £638-£1,754 |
| Sun Tunnel in Northwich | £500-£1,000 |
Clean of your conservatory gutter is probably not one of the most enjoyable chores you’d like to take on around the house. Not only is it messy and tedious, but it’s also time consuming and smelly. It’s a job every home and property owner would rather avoid, but unfortunately everyone has to do it. It’s a necessity due to the fact that neglect gutters holds and harbours mould, moss as well as plant debris. It would have been better if this is only disgusting, but the actual truth is that should be the least of your worries as this gradual build up of organic material in your conservatory gutters can minimize their drainage abilities, leading to leakages and spills that can damage your conservatory.
Cleaning of your conservatory gutter is a task that can be done regardless of your level of experience. However, it’s advisable to call in a professional for help especially if you lack the confidence required to pull it off.
How To Clean Roof Lights
If you have existing roof lights or perhaps you’re about to have them installed, it’s important to know just how to have them cleaned, even if you wouldn’t be doing it yourself. Generally, glass roof lights fitted in flat roof applications are more likely to be a major victim of staining and discolouration by several elements like rainwater, bird droppings, vehicle exhaust pollutants as well as tree sap. Therefore, just like any other parts of your home, periodic inspection of the units as well as regular cleaning is highly advised to help maintain their top performance for a lengthy period of time.
Firstly, when installing the roof lights, it’ll be helpful if its fitted at the right pitch so as to help keep the exterior clean as it enables the elements such as rainwater to run off the surface naturally. Cleaning roof lights involves working at height which can be very dangerous. Therefore, if you lack the skill and confidence to pull this off, it’s advisable to hire the services of a professional who can guarantee the best results for help. In this article, we aim to give you a good insight into how the roof light cleaning process works. Let’s have a look!
Rooflight Interior Cleaning
✓ Spread plastic under the roof light to catch dirt and spills
✓ Dust to wipe clear all loose dirt and cobwebs.
✓ Use a squeegee with a warm soapy water or any other glass cleaning product to clean the glass ( steer clear of any harsh chemicals or abrasive cleaners)
✓ Dry the roof light with a soft and lint-free cloth.
Rooflight Exterior Cleaning
✓ Access the roof safely with a specialist ladder
✓ Put mild detergent into a bucket and carry up to the roof before filling with warm water from a hosepipe
✓ Use the soapy water and a non-abrasive cloth or squeegee to clean the roof light, its surroundings as well as fixings.
Velux windows actually refer to one brand of roof window, which are windows that sit in your roof space and allow light and ventilation into your loft. But how do you install a Velux window? If you’re a competent DIYer, it’s not as difficult as you might think.
You can normally install roof windows entirely from the inside, so you don’t need to get up on your roof or hire costly scaffolding. They come with detailed installation instructions, so as long as you follow them you shouldn’t have much trouble.
Before you start, you’ll need to read up on the Building Regulations and Planning Permission laws. Speak to your local Building Control department if you have any questions.
Firstly, prepare the opening by removing enough tiles or slates from the roof. There’s no need to go out on the roof – access them by cutting away the felt underneath which will give you access to the tiles and battens. Cut away one of the battens from under a tile, then you can slide all the tiles into the roof space. You’ll need to cut away the roof timbers to make the right size opening, then add more timbers to strengthen the ones that are left.
Next, remove the opening sash from the new roof window then fit the frame into the new opening using the brackets provided with the window. Then fit roof flashing between the new window and the roof so you don’t get any leaks. Then lay your tiles back in position around the new Velux window; you’ll probably have to cut some to shape which you can do with an angle grinder. Always cut them on the ground, not in position on the roof.
Lastly, fit the sash back onto the window and you’re done!
If this sounds like too much hard work, plenty of window installers will be able to help you fit a Velux window and will probably be able to provide a much cleaner finish.
Velux windows, or roof windows, are very easy to clean. Regular cleaning helps to keep them looking bright and shiny for years to come. So how should you clean Velux windows?
If you want to clean the air filter, you can remove it and wash it with your normal household cleaners. Velux windows have a cleaning position, so rotate and secure it into this position then remove the filter. You should be able to buy new filters from the manufacturer of your roof window.
To clean the outer pane, there’s no need to lean out of the window and risk falling out. Simply rotate the sash (the opening part) 180 degrees and secure it into position. Then you can clean the pane with a soft, lint-free cloth, sponge or squeegee and clean water. If you live in a hard water area, add some detergent to the water and wipe the window dry when you’re finished. You can also use normal non-abrasive household cleaners.
It’s recommended that you clean the flashing around your roof window at least once a year. You can use a brush to do this. This will allow rainwater to flow freely and stop any leaves from collecting.
If you’re in any doubt about using certain cleaners on your Velux windows, get in touch with the manufacturer who should be able to help. You can also do a patch test on an inconspicuous area if you’re unsure.
Chimney liners are a very important component of the chimney, but the fact is most home and property owners either continue to overlook them or aren’t even aware of their existence. This is, however, quite understandable given the fact that they usually last a long period of time – more than 50 years. To ensure that they last that long, the question that arises is, do chimney liners need to be swept and cleaned? The short and simple answer to this question is yes, chimney liners definitely needs to be cleaned on a frequent basis. A chimney liner happens to be an essential part of your chimney. When it’s not cleaned, it tends to accumulate dust, soot and dirt which can give rise to a number of problems you’d rather want to avoid. Chimney liner are able to provide adequate protection to your flue but even at that the water, creosote and other contaminant build up can make the liner to deteriorate, and making it unsafe for usage. In other words, contrary to several belief, chimney liners do need the same amount of cleaning as chimneys without liners. Failure to sweep your chimney liners can give rise to the following problems:
How To Repair Roof Leak
Asphalt shingles are the most popular roofing material options for most UK homes in recent times. Thanks to them, roof repair is now all about identifying the leak and sealing it the right way. If you’re a competent DIYer and confident enough to pull this off, then this should be done within a short period of time and saving you money as well. However, if you don’t have the confidence to pull this off, then calling on a professional roofer who can guarantee the best results will be your best bet. In this article, we’ll consider four simple steps you can take to repair an asphalt shingles roof.
✓ Locate the spot of the roof leak. Roof leaks are mostly made evident by water stains on the ceiling. Simply note the spot of this water stain, grab a good pair of binoculars, then go outside to identify the location of the roof leak. Search the area for any curls, cracks, missing shingles or anything that looks odd. Leaks can also occur at any spot where caulking and flashing have been affected or compromised.
✓ Secure curled shingles. To do this, simply brush on a generous amount of asphalt roofing cement to the underside of the shingle and press firmly to set.
✓ Replace damaged or missing shingles. In the event whereby the shingles are cracked, rotten or missing, your best bet would be to have them replaced. Simply remove the damaged shingle then slide in the new one under the one above and align it with those on either side. Once done, you can then secure it with 6d galvanized roofing nails at each corner. After completion, make sure you cover the nail heads with roof cements.
✓ Fix flashing. To do this, simply reseal joints with the help of a caulk gun loaded with roofing cement.
It can be easy to repair a felt flat roof depending on the problem. If you’ve got an old-style pour-and-roll felt flat roof, you might be starting to run into problems, but even if you have a newer torch-on felt roof, issues can occur. You might find cracks, lifting, leaking flashings or dips and hollows in the felt. Luckily, there are some easy fixes – but the best thing to do to prolong the life of your felt flat roof is to get a professional to look at it.
If your felt flat roof only needs a small repair, you might be able to get away with using a paint-on fix from a tin that you just brush on. However, if you want a more permanent fix, you’ll need a few more tools and supplies.
You can use a patch of torched-on roofing felt over the crack or leak, but if your flat roof is very damaged or wet it might not take it. You can also buy liquid systems for felt roofs, but again, there is a possibility that your roof might not take it. Also most of the high-quality liquid systems are only available for trade customers, so you might be better off asking a roofing pro to do it for you.
A roof serves as something which is so much more than just a top of a building. A roof delivers guard from the elements and precipitation, it also helps drain water from a structure, and helps to provide insulation to the structure allowing it to keep the interior of a building cool or warm, according to season.
There are several steps to building a roof
Mount the trusses.
This step requires the building’s wall frames to be completely level, square and plumb. If you are building the roof onto a building that is still a frame you must use ladders or scaffolding. Hoist the trusses onto the roof.
Install temporary braces.
You will need to install temporary braces that the trusses can rest on until the sheathing and permanent bracing are installed, this has to be done before you install the trusses. At the centre of the back wall, nail the bottom half of one two-by-six board that's 16 feet long to the top of the outside wall, making sure you fasten it to a stud.
Install the end trusses.
Install the two end trusses at the front and back of the building, making sure you affix them to the temporary bracing. The batten you take will have to be a bit longer than the distance will separate the trusses.
Install the standard trusses.
According to the instructions provided by the manufacturer, you will first need to install the first standard truss. You will also need to nail it to the batten from the first truss.
Sheath the roof.
Once your trusses permanently braced, you can begin with the sheathing of the roof. Starting from the bottom corner and moving across the bottom, the sheathing is installed lengthwise.
Install the roof cover.
Like the sheathing and underlayment procedures, the roof cover is installed lengthwise from the bottom up. The shingles should be staggered, and they should also overlap at the same time. You will need to work up to the ridge and use a ridge cap shingles to finish the ridge.
Answer a few quick questions to help us match you with the right Roofer
Receive no-obligation quotes from 4 Roofers working in Northwich.
Compare prices, customer reviews and services, and hire the right Roofer.
View our open Roofer jobs near you
Join today

